

AD&D Map: The Drowned Counting Hall
For Levels 4 to 6

Name of the Dungeon: The Drowned Counting Hall
Recommended Levels: 4 to 6
Possible Location: Beneath a trade road that once served a river port, now half-silted and abandoned. The upper levels collapsed years ago. Only this lower vault remains intact, sealed by accident and neglect.
Theme: Wealth sealed away and claimed by something that does not understand it, but refuses to surrender it.
Tone: Claustrophobic. Damp. Heavy air. Every step echoes. The sense that this place was meant to protect coin, not people.
Adventure Hooks:
A merchant house claims a shipment of silver vanished decades ago and believes it lies in a sealed vault beneath the old road. They want it recovered quietly.
A cleric reports that undead have begun rising near the abandoned port. Divinations point underground.
A rival adventuring band entered through a sinkhole three days ago and has not returned.
Local farmers complain of foul water and livestock deaths. Something below is poisoning the runoff.
A map fragment shows a hidden treasury marked with five chambers and a central vault.
Random Wandering Monster Table
Check every 3 turns. On a 1 on 1d6, roll 1d6:
1–2: 2–8 Giant Rats
3: 1–4 Ghouls
4: 1 Ochre Jelly
5: 2–5 Bandits searching for treasure
6: 1 Wight
Keyed Locations
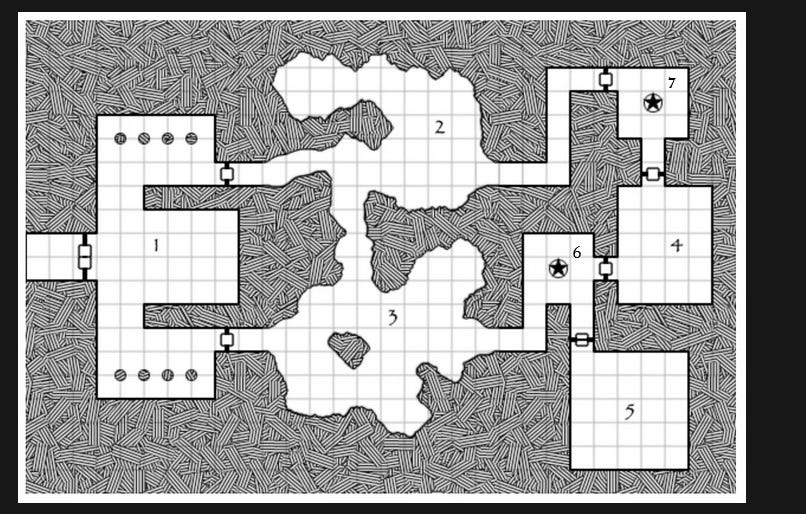
Room 1
Description: A rectangular guard chamber with two barred alcoves to the north and south. Iron rings set into the walls. Rust flakes cover the floor. There are over turned and broken tables with chairs scattered.
Room Dressing: Broken spears, rotted shields, a toppled wooden table fused to the stone by mineral buildup.
Encounter: 2–4 Skeletons rise from the northern alcove when the room is entered. They still wear fragments of livery bearing a faded merchant sigil.
Treasure: Each skeleton has 1d4 silver pieces scattered in the dust. Beneath one of the table is a small iron coffer containing 120 gp and a potion of healing.
Feature: The North Eastern door to chamber 2, is swollen and sticks. Forcing it requires a bend bars roll or 3 rounds of loud effort. Either way, this automatically triggers a wandering monster check.
Room 2
Description: A long chamber with uneven stone ledges and a partially collapsed ceiling. Water drips constantly into shallow pools.
Room Dressing: Slick algae on the stones. A faint smell of decay.
Encounter: An Ochre Jelly clings to the far wall disguised by damp stone. It drops on the last character entering.
Treasure: Dissolved remains of prior victims include 2 daggers, 40 ep, and a silver ring worth 75 gp.
Feature: The northern passage narrows and forces single-file movement. No shield use possible while passing through.
Room 3
Description: Giant damp chamber. Rough circular space with broken stone “islands” in a shallow flooded basin.
Room Dressing: Ironbound chests discarded everywhere. Most split open and empty.
Encounter: 1 Wight blends into the south chamber wall. He silently waits. It was once the chief accountant. It does not speak. It attacks the strongest-looking character first.
Treasure: One intact chest contains 1,200 sp, 300 gp, and a scroll of protection from undead.
Feature: The water is 2 feet deep and slows movement to half. Anyone knocked prone risks dropping gear into murk.
Room 4
Description: Beds line the walls, in this room. Mostly musty, old and smashed. This appears to have been sleeping chambers.
Room Dressing: Old smashed beds.
Encounter: None.
Treasure: In the rubble, after searching 10 GP can be found wrapped in an old pillow sheet.
Feature: Dark, moldy, musty room with a faint smell of decay.
Room 5
Description: A large storage vault. Dry compared to the others. Stone shelves line the walls.
Room Dressing: Broken crates, ledger fragments, rotted cloth sacks.
Encounter: 3–6 Bandits are camped here. They entered from a surface crack weeks ago. They are low on food and desperate.
Treasure: Bandits carry 2d20 gp total, short swords, and one has a map fragment showing another buried vault nearby.
Feature: The southern wall has a concealed crack large enough for single-person escape. It leads to the surface after a steep crawl.
Room 6
Description: A square chamber with a faded star emblem carved into the floor. Burn marks on the walls.
Room Dressing: Melted candle stubs and a cracked bronze bowl.
Encounter: 1–3 Ghouls lurk here. They were trapped here and feed on anything that wanders in.
Treasure: In the bronze bowl are 5 small garnets worth 50 gp each.
Feature: The star carving is a failed ward. Detect magic reveals faint abjuration. It no longer functions.
Room 7
Description: a very small prayer chamber room. In the center is a large pentagram. In the middle of that pentagram is a bowl.
Room Dressing: Melted candle stubs and a cracked bronze bowl. The bowl is empty, but it appears it has stains of blood in it.
Encounter: 2 Skeletons lurk here. Their bones are a pile in the corner and only rise up if someone comes to inspect it.
Treasure: In the bronze bowl are 5 small garnets worth 50 gp each.
Feature: The star carving is a failed ward. Detect magic reveals faint abjuration. It no longer functions.
Monster Reference Table
Skeleton: AC 7, HD 1, MV 12”, immune to sleep and charm, weapon damage by type.
Giant Rat: AC 7, HD 1/2, MV 12”, bite 1–3 damage.
Ghoul: AC 6, HD 2, MV 9”, 3 attacks 1–3/1–3/1–6, paralysis on hit unless save vs paralysis.
Ochre Jelly: AC 8, HD 5, MV 3”, 1 attack 2–12, immune to lightning and cold, splits when struck by lightning.
Wight: AC 5, HD 4+3, MV 12”, 1 attack 1–4 plus energy drain, immune to sleep and charm.
Bandit: AC 7, HD 1, MV 12”, weapon damage by type, morale 50%.
Notes
This dungeon rewards caution. Noise brings trouble. The central chamber is the real threat. If the party presses hard and fights loud in Room 1, the Wight may hear them and move to intercept. If they negotiate with the bandits, they may gain allies against the undead.
Water slows them. Doors stick. Treasure weighs something.
This place was built to hold wealth. Now it holds grudges.